

A few posts ago, I wrote about a Milton player piano that I had acquired. The keys were not in the best shape; the front and balance rail bushings were falling out, the key buttons were coming unglued, and most of the keytops had come off or were just barely hanging on.
I ordered a full set of Gloss White Vagias Plastic Keytops with short heads from Schaff Piano Supply, as well as a set of 3 1/2" Gloss Plastic Sharp Keytops for the black keys. It is important to get the right length of keytop to minimize the amount of sanding and filing of the keytops later on.
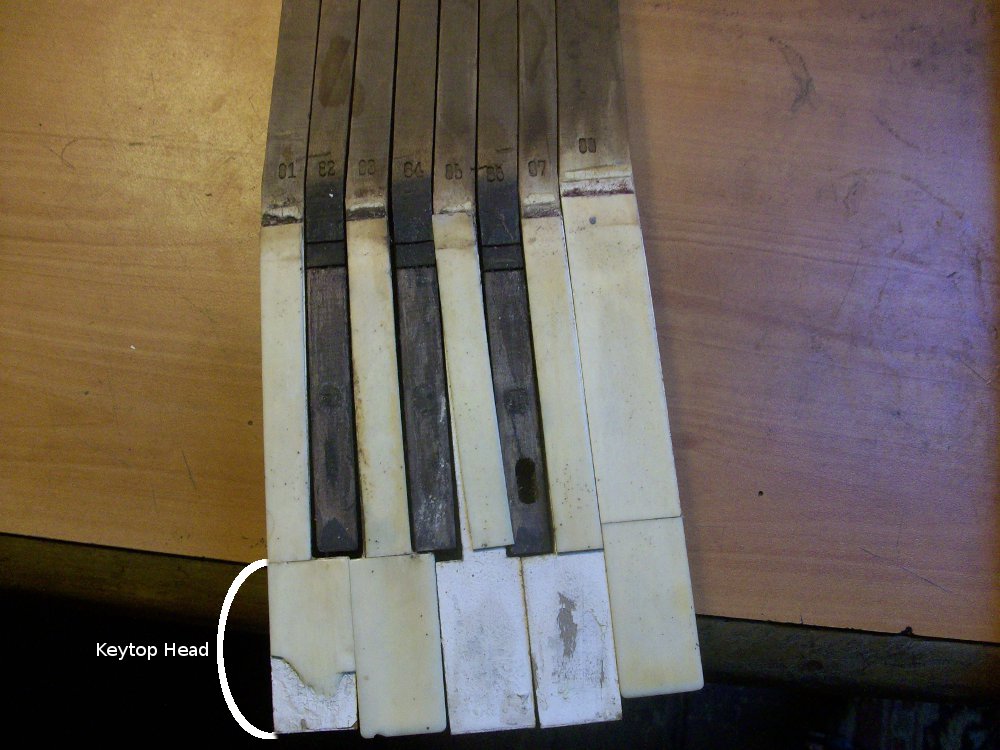
You can see the original ivory keytops above. They look terrible and need to be removed. The black ebony keytops have already fallen off. To remove the remaining ivories, loosen the glue by covering them with a damp cloth and steaming them with a hot clothing iron. Keep the iron moving and steam each area for 5 seconds or so.
When the glue is adequately loosened, the keytops should pry off the keys with very little effort. If the glue is still holding, re-steam the keys to reduce the risk of prying any wood chunks off with the keytops. For the black keys, repeat the same process, except steam the sides of the keytops instead of the top.


After all of the old keytops have been removed, the keytops need to be prepped for the new keytops. This means making the top surface of the keys flat, as well as reducing the thickness of the keys if the new keytops are thicker than the old.
I use a table saw to accomplish both of these tasks at once. Because the old ivories are significantly thinner than the new plastic keytops, I set the fence to remove about a millimeter from the tops of the white keys. I clamped a block to the back of the fence to act as a depth stop, as well as a block to the table to mark the fence adjustment, which allows me to move the fence away after the key has been trimmed, and precisely move the fence back after the key has been pulled away from the blade.

Raw key after removing the keytop


Key after facing on the table saw

After trimming all of the white keys, I make sure all of the keys are flat by gluing some sandpaper to a precision ground surface (I use a slab of marble countertop) and sanding down any irregularities.


The keys are now all prepped and ready for the new keytops. I use contact cement to attach the keytops. Contact cement works by brushing some cement onto both surfaces, and then waiting some time for it to partially cure before clamping the two surfaces together.


The front ends of the white keytops are rounded and are meant to overhang the end of the keys by a few millimeters. In order to get a consistent amount of overhang, I use a simple jig made of a couple coins and a bit of cardboard. One of these days I will make a nicer jig out of wood, but this works for now.

Cement applied to key and keytop

Place the white keytop on the key with the end butted up against the gauge. Press down firmly and then clamp the key firmly in a woodworking vise to set the ketyop. Repeat this process with the black keys, but just align them visually, no need for any kind of jig.


After the cement has dried the keytop may need a bit of sanding or filing to make the edges flush with the key body. Do this carefully, as it is easy to quickly ruin the appearance of your new keytops.
Recent Blog Posts


I have been servicing and tuning pianos in NOLA since 2012 after first becoming interested in piano technology in 2009. With a background in teaching bicycle mechanics, I bring a methodical mindset and a love of sharing knowledge and skills to the rich musical culture of New Orleans.