How to Splice Piano Wire

Replacing a piano string is not as simple as it first seems.  New piano strings are very unstable and need time to stretch before they will hold a pitch for an extended period of time.  Often times, a new string will require upwards of five or six tunings before it is acceptably stable.

Because of this, it is often a better idea to splice a broken string rather than replace it completely.  This is especially true for wound bass strings which are both more expensive and have greater tonal variation than plain gauge strings.

Strings will almost always break near the tuning pin or the hitch pin.  I have never seen a string break in the middle.  This is helpful because it means that we can remove the short piece of the broken string and tie in a piece of new piano wire.  This new length of wire will stretch just like a full new string would, but since the stretch will be limited to a short section it might only take one or two tunings to stabilize.

To splice a wire, we will use the piano tuner's knot.  This knot is very simple, however it can be a bit difficult to actually tie due to the stiffness of piano wire.

Photo Dec 20, 12 54 04 PM.jpg

To begin, make a clockwise loop in the lower wire.  Be sure that the working end of the wire passes underneath the standing part of the wire.

Photo Dec 20, 1 36 45 PM.jpg

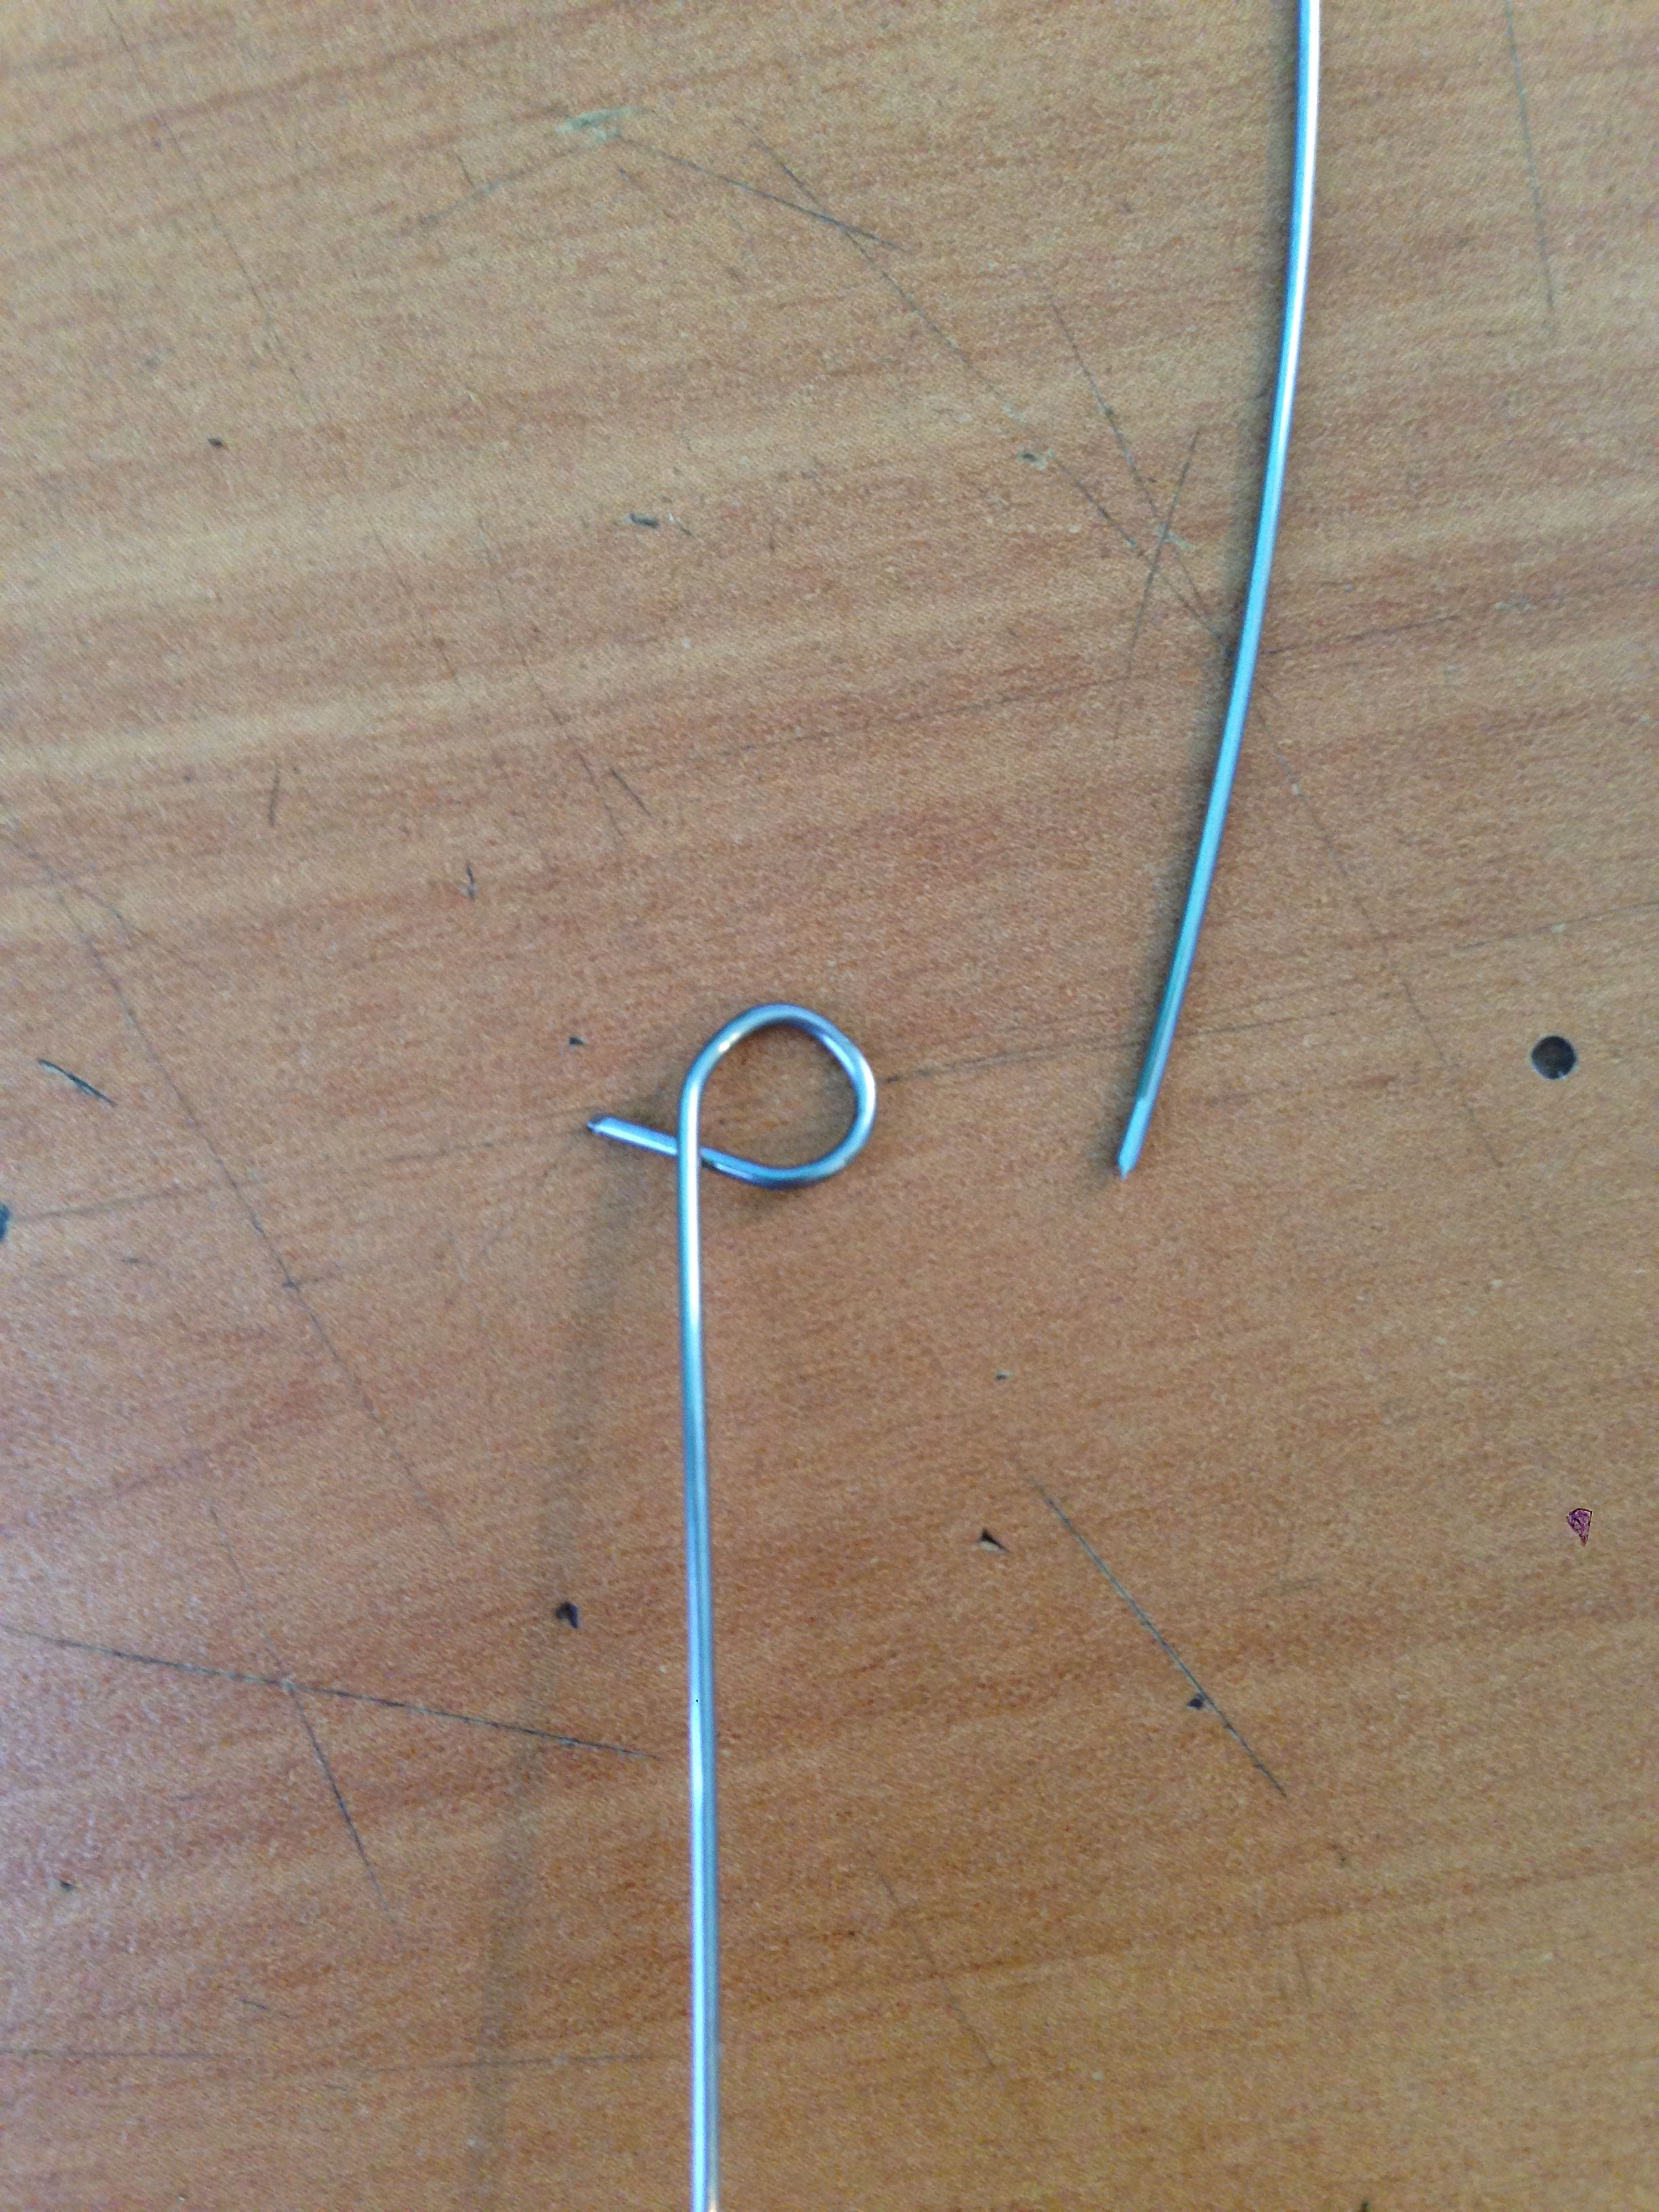
Next, make a counter-clockwise loop in the upper wire.  Again, be sure that the working end passes underneath the standing end.

Photo Dec 20, 1 39 03 PM.jpg

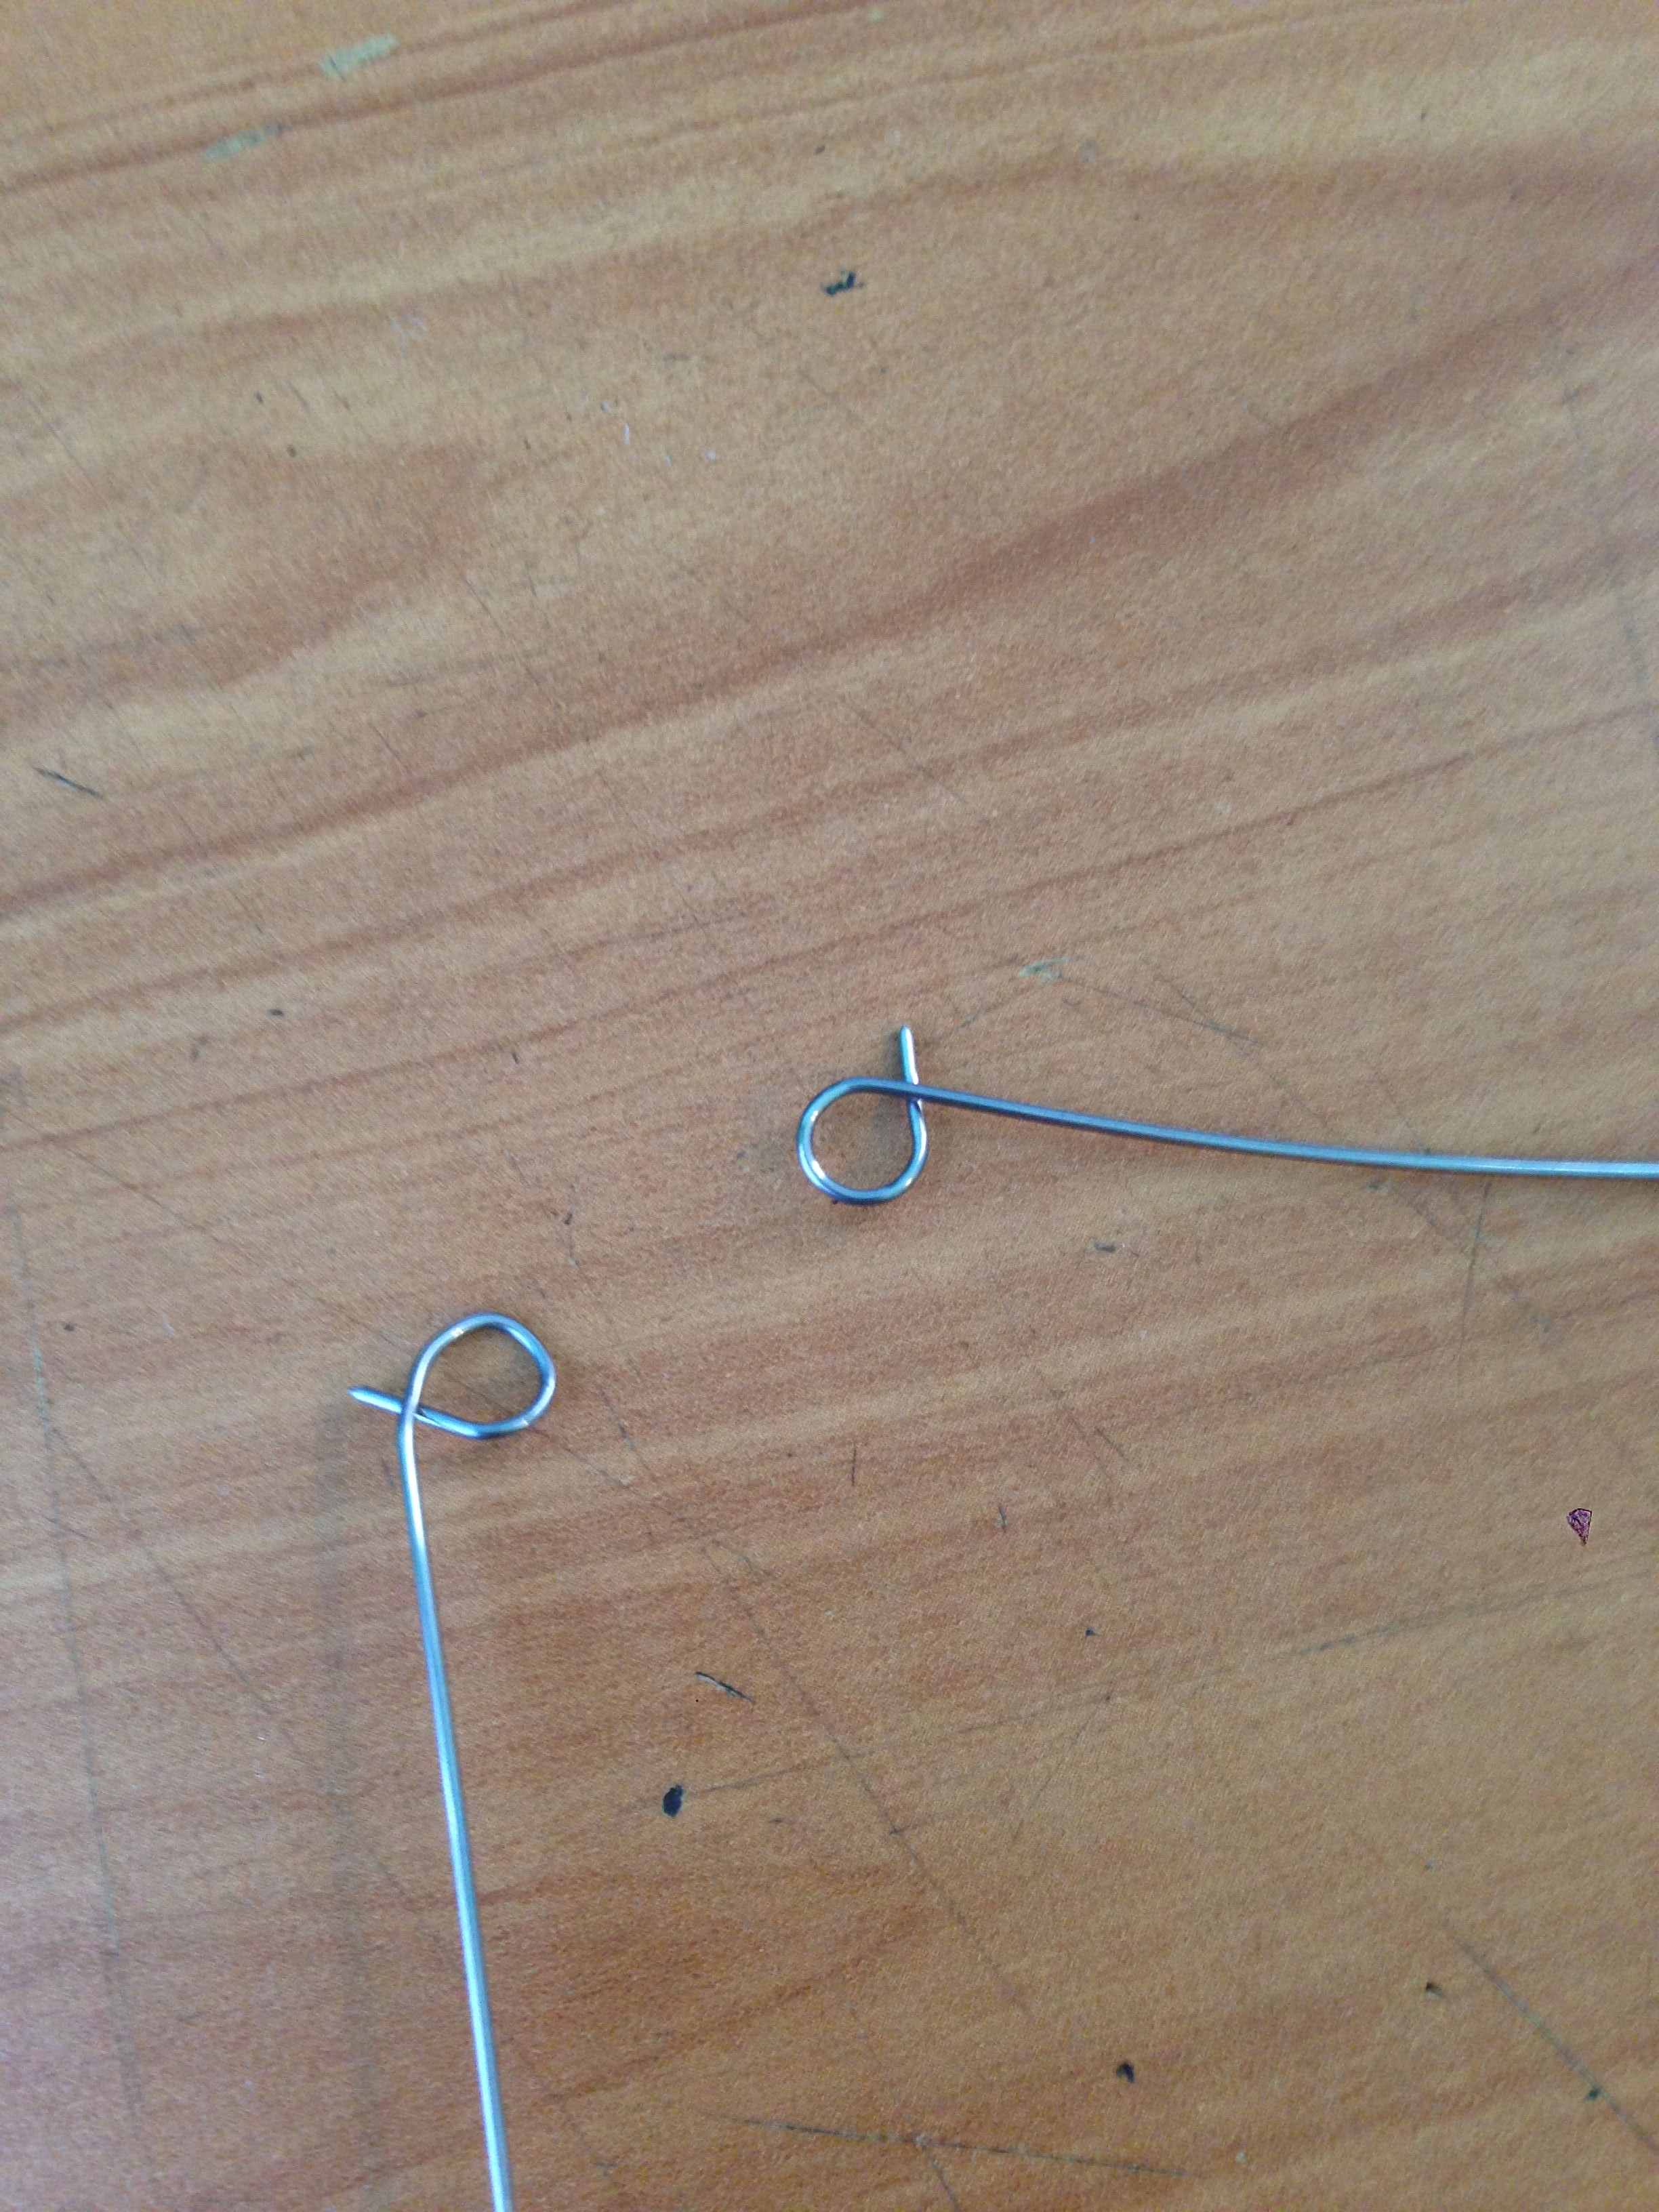
In the lower wire, fold the loop 90 degrees downward, so that the tip of the wire is inside of the bend.

Photo Dec 20, 1 39 25 PM.jpg

Hold the upper wire across the lower wire with the end pointing upwards.

Photo Dec 20, 2 10 00 PM.jpg

Pull the upper wire across to interlock the upper wire loop with the standing part of the lower wire.

Photo Dec 20, 1 40 38 PM.jpg

Rotate the upper wire so that tips of the two wires are pointing in opposite directions.

Photo Dec 20, 1 41 12 PM.jpg

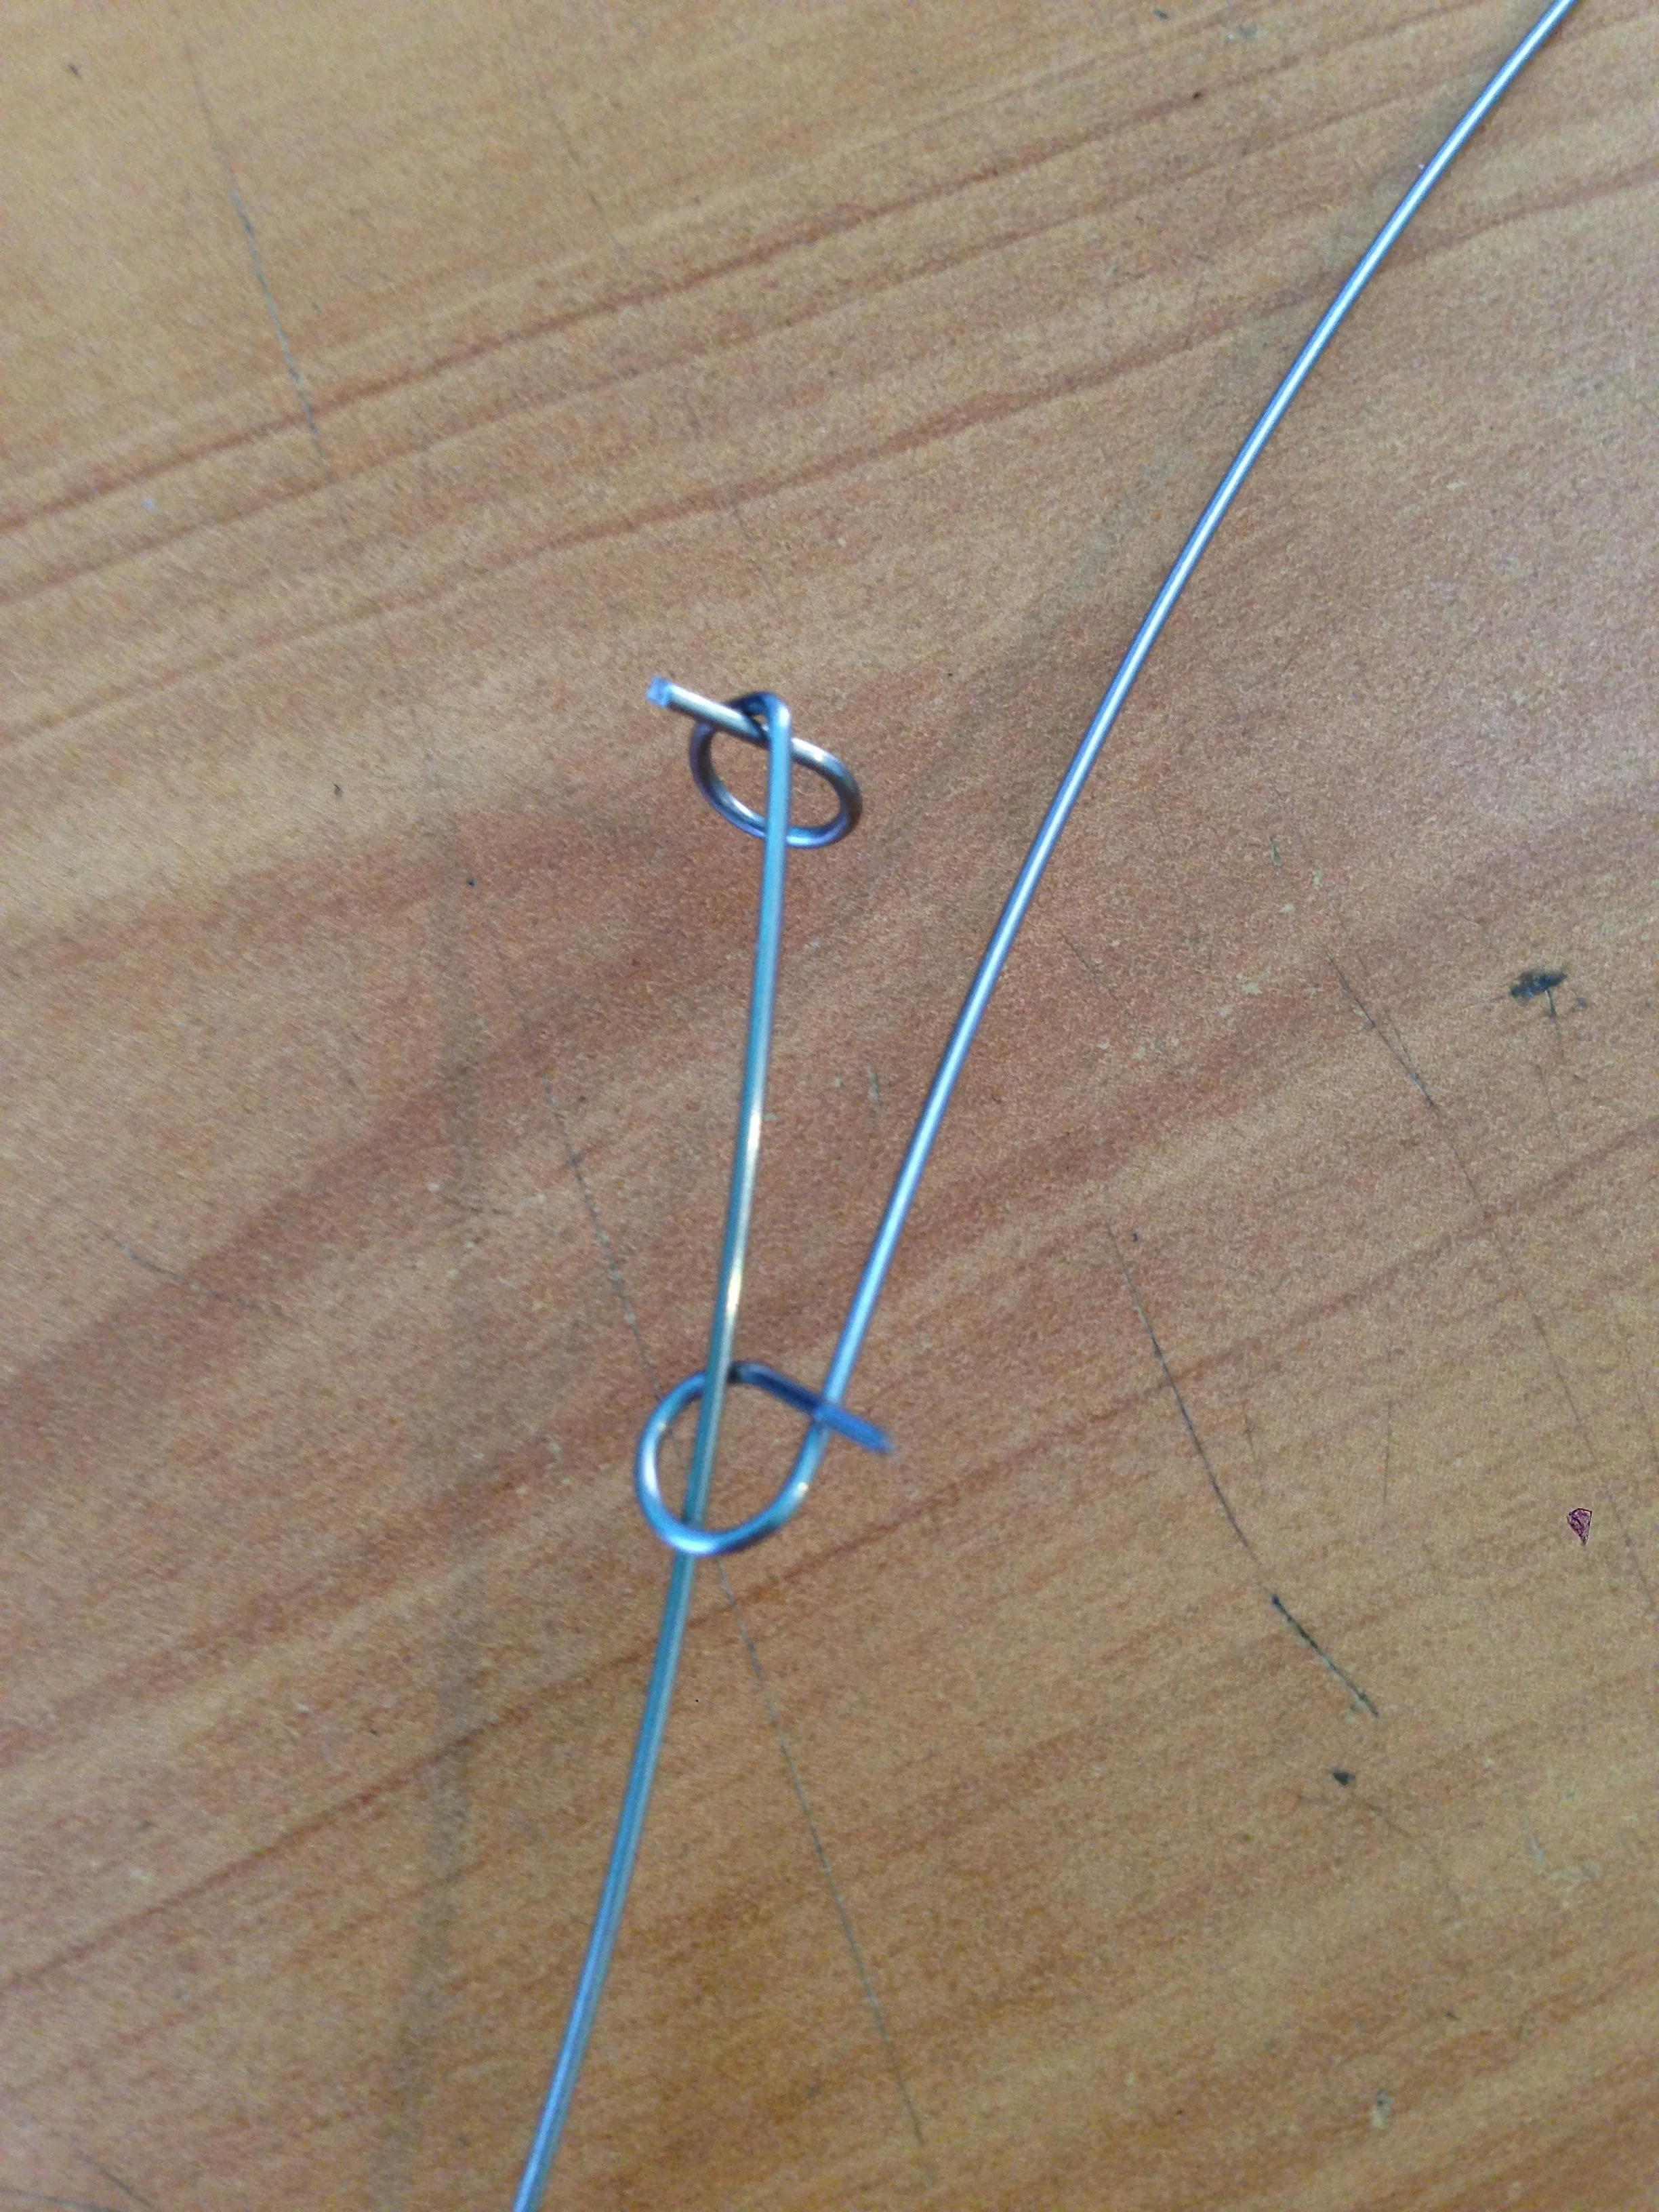
Bend the upper wire in order to feed the standing end through the loop of the lower wire.

Photo Dec 20, 1 42 32 PM.jpg

That is the piano tuner's knot!  When this knot it pulled tight during tuning, the two loops will lock against each other and hold tension.

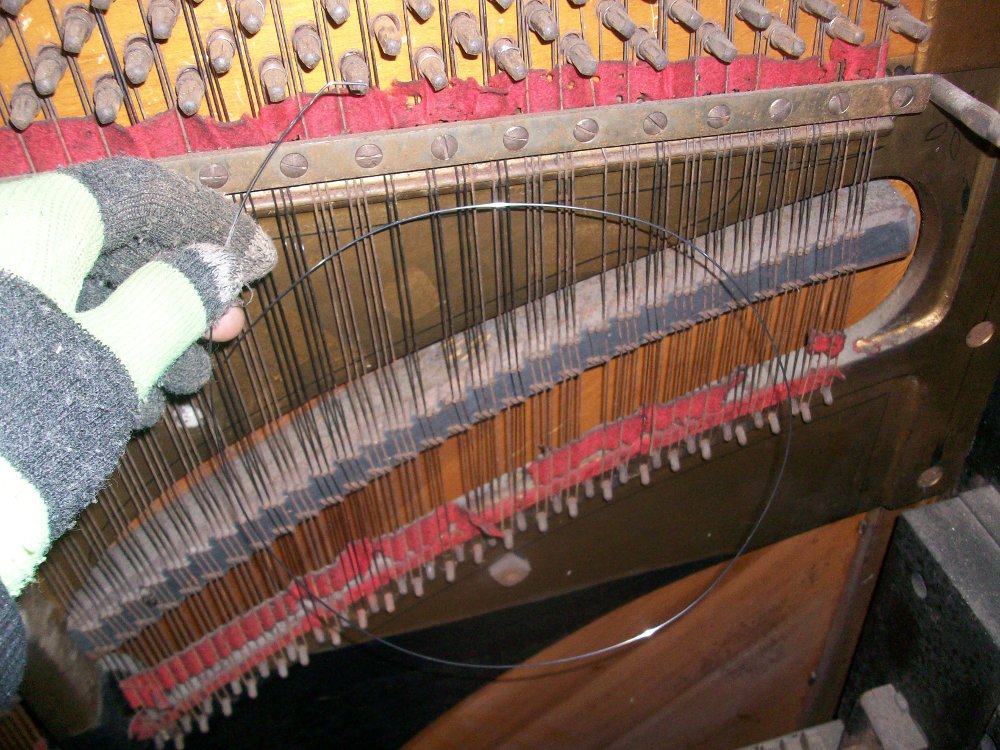
When tying this knot in a piano, you want the knot to end up in a location where it wont be touching anything (i.e. the plate, tuning pins, other strings).  Sometimes it might take a few tries to get the knot to be in an acceptable location.

Recent Blog Posts


See more of my blog posts here

Hello There! Don't Leave Just Yet!

I provide piano repair information on my blog and through email correspondence free of charge because I like to help people learn about pianos. However, it does take up a significant amount of my time. So, if you are so inclined, you can click the button below to help supply my caffeine habit and show your appreciation for my work. Thank you!

Buy me a matcha latteBuy me a matcha latte

Or Send Bitcoin! bc1q4tz3qzp6a6zeduqema3v6s0vnrhst4zwy4wtp9

Broken Strings Cause More Trouble Than You Might Think.

There are a lot of heavy-handed pianists out there who seem to have a misconception about the ease of replacing broken piano strings.  Replacing a broken string is not a "fix it and forget about it" kind of problem.

There are two types of strings in a piano: wound strings and plain (straight gauge) strings.  Wound strings are found in the bass section and are composed of a steel core running the length of the string, and a copper winding that is wrapped around the core.  Plain strings are found everywhere else in the piano and are simply a steel wire of an exact, consistent diameter throughout its length.

When it comes to replacing a broken string in a piano, the procedure is fairly simple.  The problems arise after the string has been replaced.  Piano strings, whether wound or plain, will stretch over time due to the large amount of tension that they are placed under.  This has the effect of very slightly lengthening the string, which causes the tension to drop slightly as well.  Since the pitch produced by a string is affected by its mass, length, and tension, any changes in these properties will cause a change in pitch.

After a manufacturer has finished building a new piano, they will tune it a half a dozen times or more to ensure they get as much stretch out of the strings as possible.  Without this, the tuning of the piano would be very unstable and the pitch of all of the strings would drop very quickly as they stretched.

The problem here lies in the fact that most piano tuners aren't going to want to tune your piano six times over the course of a few days.  So, when a string breaks in your piano, it will be replaced and freshly tuned, but that new string will go out of tune much faster than the rest of your piano.  The best way to deal with this is to mute any new strings until they have been tuned enough times to become stable.  On a typical home piano, it can take years before the strings have fully stretched out and stabilized.  Muting the string ensures that it won't be audible as it goes out of tune.  However, this comes with the trade-off of slightly lower volume in the bichord and trichord sections of the piano.

In the low bass, where each note is only comprised of a single string, the pianist must simply deal with the string going quickly out of tune, as a mute would deaden the note completely.

In addition to this, missing strings can wreak havoc on action parts inside the piano.  hammers will wear unevenly, bushings in the hammer flanges will get torn up, and grand hammers can get wedged against their dampers.

Basically, take it easy on your piano and you won't have to deal with the long-lasting effects of string replacement.

Recent Blog Posts


See more of my blog posts here

Hello There! Don't Leave Just Yet!

I provide piano repair information on my blog and through email correspondence free of charge because I like to help people learn about pianos. However, it does take up a significant amount of my time. So, if you are so inclined, you can click the button below to help supply my caffeine habit and show your appreciation for my work. Thank you!

Buy me a matcha latteBuy me a matcha latte

Or Send Bitcoin! bc1q4tz3qzp6a6zeduqema3v6s0vnrhst4zwy4wtp9

Replacing Hammer Rail Felt

Old upright pianos tend to develop all sorts of strange clunks, clicks, and buzzes. One cause of these noises is worn hammer rail felt. Over time, this felt becomes compacted and no longer provides adequate cushion for the hammer shanks. The compacted felt gives a dull thud when the shanks return to rest. Fortunately, this felt is very easy and quick to replace.

The small "wells" that the hammer shanks have made in the felt are a sign that it should be replaced.

The small "wells" that the hammer shanks have made in the felt are a sign that it should be replaced.

Begin by removing the hammer rail from the piano action. It will have 3 or 4 metal prongs that are inserted into bushed holes in the action brackets. One prong will face the opposite direction of the others. Bend this prong back enough to clear the action bracket, and lift the hammer rail away from the action.

The prong and the bushed hole that it lives in.

The prong and the bushed hole that it lives in.

On some pianos, it is easier to just remove the action bracket that the odd-ball prong fits into, rather than bending the prong.

The leftmost prong.

The leftmost prong.

Once the hammer rail is removed, peel away the old rail cloth and measure its width. Buy a roll of new hammer rail felt of the same width.

Old felt peeled away and new felt at the ready.

Old felt peeled away and new felt at the ready.

Purchase a bottle of wallpaper remover and mix a small amount with water according to the instructions. Use an old toothbrush to wet the old glue with the remover. After a few minutes, the old glue should easily scrape off.

Apply PVC-E or hide glue to the lower half of the hammer rail and lay the new felt across it.


It is important to not glue the top edge of the felt. Leaving this edge loose allows a bit more cushion for the falling hammers

PVC-E glue applied. Note that the edge furthest from the prongs does not have glue applied to it.

PVC-E glue applied. Note that the edge furthest from the prongs does not have glue applied to it.

After the glue dries, trim the ends of the felt flush with the ends of the hammer rail.

Reinstall the rail onto the piano action and either bend the prong back into place or reinstall the action bracket that was removed.

The new hammer rail felt.

The new hammer rail felt.

Recent Blog Posts


See more of my blog posts here

Hello There! Don't Leave Just Yet!

I provide piano repair information on my blog and through email correspondence free of charge because I like to help people learn about pianos. However, it does take up a significant amount of my time. So, if you are so inclined, you can click the button below to help supply my caffeine habit and show your appreciation for my work. Thank you!

Buy me a matcha latteBuy me a matcha latte

Or Send Bitcoin! bc1q4tz3qzp6a6zeduqema3v6s0vnrhst4zwy4wtp9

Trimming Key Leads

A problem that I occasionally find in older pianos is that of expanded key-leads.

These expanded key leads are causing the keys to bind against each other. This issue was caused by rodents living in the piano, as is evident by the teeth marks on the keys.

These expanded key leads are causing the keys to bind against each other. This issue was caused by rodents living in the piano, as is evident by the teeth marks on the keys.

If you look at a piano action, you will notice that the hammers at the bass end are much larger (and therefore heavier) than the hammers at the treble end. The heavier bass hammers take more force to push toward the strings than the lighter treble hammers.

In order to create a consistent amount of pressure needed to play the keys across the keyboard, lead weights are pressed into the sides of the keys. Keys that push heavier hammers have more weight pressed into them than keys that push lighter hammers. The lightest hammers at the far right end of the keyboard have no weight added at all.

If moisture or an acidic environment is introduced into the keyboard, it will cause the lead to oxidize and expand. Some technicians claim that keys that are made from basswood naturally create a slightly acidic environment. This means that the best way to avoid this with a basswood keyboard is to aerate the keys by leaving the fallboard open at all times. Other ways that key leads can oxidize is if water is spilled into the keyboard, if the piano lives in a very humid environment, or if rodents live in the piano and are urinating on the keys. Usually, you can get an idea about what the cause is by looking to see where the oxidized leads are located. If the whole keyboard has expanded leads throughout, it is likely the cause of high humidity or unventilated basswood keys. If the oxidation is concentrated in small areas, there was likely a liquid spilled on the keyboard or mice living in the piano.

A little bit of oxidation of the key leads wont hurt anything, but eventually the leads can expand so much that they will rub on neighboring keys. This will cause friction and result in sluggish or binding keys. When this happens, they key leads need to be trimmed so that they are once again flush with the side of the key. Be careful when undertaking this process, as lead dust is toxic if inhaled. Wear a respirator and gloves, and have a vacuum with a HEPA filter handy to clean up the dust during the process.

The first step is to remove all of the offending keys from the keybed.

An expanded key-lead.

An expanded key-lead.

Set them down on a rag and vacuum up any lead dust that is left on the keybed. Using a sharp chisel, slice through the expanded key-lead so that it is flush with the side of the key.

Make sure your chisel is sharp before cutting into the key-lead.

Make sure your chisel is sharp before cutting into the key-lead.

Pushing the chisel through the key-lead.

Pushing the chisel through the key-lead.

The goal is to create as little dust as possible, so avoid using a file or sandpaper. Go down the line of keys, slicing through the expanded leads on each side, and vacuuming up the dust and lead scraps.

The trimmed key-lead.

The trimmed key-lead.

After trimming the leads, I like to brush some lacquer or shellac over the exposed sides of the leads to prevent further oxidation.

Both sides of the key-lead have been trimmed flush with the key.

Both sides of the key-lead have been trimmed flush with the key.

Replace the keys and test them to make sure they all move smoothly. Finally, vacuum up any lead dust that fell onto the rag.

Recent Blog Posts


See more of my blog posts here

Hello There! Don't Leave Just Yet!

I provide piano repair information on my blog and through email correspondence free of charge because I like to help people learn about pianos. However, it does take up a significant amount of my time. So, if you are so inclined, you can click the button below to help supply my caffeine habit and show your appreciation for my work. Thank you!

Buy me a matcha latteBuy me a matcha latte

Or Send Bitcoin! bc1q4tz3qzp6a6zeduqema3v6s0vnrhst4zwy4wtp9

Re-Tubing a Tracker Bar

The upper stack of a player piano after replacing the lead tubing with new rubber tubing.

The upper stack of a player piano after replacing the lead tubing with new rubber tubing.

One of the more delicate parts of a player piano system is the series of small tubes connecting the tracker bar to the valves. The tracker bar is the brass bar in the top-center that “reads” the holes in the music rolls.

The tracker bar

The tracker bar

When the pedals of a player piano are pumped, a vacuum is created inside the body of the system (aka the “valve chest”). This is where the valves are located. The vacuum also continues up through all of the tubes and into the tracker bar. When a hole in the music roll passes over the tracker bar, air is pulled into the corresponding tube which directs it to the “pouch board”. The pouch then operates the corresponding valve (which plays a specific note on the piano). In most old player pianos, these tubes are made of lead. Yes, that heavy, toxic metal that you hear so many bad things about. While lead is not harmful as long as it isn't disturbed, it can oxidize over time. This causes problems in player pianos because as the inside of the lead tubing oxidizes, it creates small, dusty particles that get pulled into the valve chest and can interfere with the action of the valves. This lead oxide can also be harmful if it is inhaled. Be sure to wear a lead-approved respirator as well as gloves while handling lead tubing. It is impossible to tell from the outside if the lead is oxidizing or not, because the outside of the lead tubing will be coated with shellac in most pianos, preventing its oxidation. The only way to tell if there is a problem is to cut open one of the tubes and look inside. If there is no powdery substance inside, simply splice the tube back together with a small piece of rubber tubing. If there is oxidation inside, the tubing should all be replaced.

For more information about the danger of lead tubing, take a look here: http://www.player-care.com/lead_tubing.html.

Before starting, order your new rubber tubing. You can get it here: http://www.player-care.com/tubing.html. Standard tracker bar tubing is 9/64” Inside Diameter. You will need at least 100 feet to re-tube an entire tracker bar. While you are at it, order 100 straight brass connectors for 9/64” ID tubing as well. You will need these later.

You will need to remove the upper stack (this is the assembly that sits on top of the keyboard and is comprised of the valve chest, striker pneumatics, and spoolbox). On Standard-type player actions, this is held in place by one large vertical screw on the right side and four medium-sized horizontal screws on the left. After removing these, the player action can be slid toward the front of the piano and lifted out. Rotate it 180 degrees and set it on a sturdy workbench. Before cutting anything, make note of any tubing that connects to any other devices. There will usually be a few tubes connecting to the tracker pneumatic on the left side (if viewed from the front). Make a drawing of where these tubes connect on each end, as they need to be re-tubed in the same order.

The tracking pneumatic. Before cutting the lead tubing, be sure to make a diagram of all tubes and where they connect on each end.

The tracking pneumatic. Before cutting the lead tubing, be sure to make a diagram of all tubes and where they connect on each end.

Using a shears, cut through the center of all of the lead tubing. The tubing is probably cemented directly into the pouch board. You will need to remove the tubing from the board. This is usually easy to do after the cement around the tube has been chipped away. Just gently grab the tube with a pliers and twist it back and forth until it comes free. If the tube breaks off, turn a screw into the center of the tube and use that to pull out the stump. To remove the tubing from the tracker bar, separate the tracker bar from the spoolbox by removing the two machine screws from each side. Soak the tracker bar in kerosene for a day or two until the tubing has softened enough to be scraped off. Give the tracker bar a good polishing with 0000 steel wool while you have it out.

The removed tracker bar ready for cleaning.

The removed tracker bar ready for cleaning.

The backside of the spoolbox after removing the tracker bar. Notice the holes in the pouch board at the bottom of the photo where the lead tubing has been removed from.

The backside of the spoolbox after removing the tracker bar. Notice the holes in the pouch board at the bottom of the photo where the lead tubing has been removed from.

While the tracker bar is soaking, the holes in the pouch board need to be modified. The new tubing cant be cemented directly into the board like the old tubing. Instead, the straight brass connectors that you bought are going to be glued into the board with burnt shellac. Burnt shellac can be made by buying a can of clear shellac from any hardware store, pouring about a cup into an old steel pot and igniting it. The alcohol will slowly burn off and the shellac will become thicker. Put out the flame by putting a lid on the pot after about 5 minutes. Let the shellac cool and then test the consistency. It should be about as thick as Elmer's Glue. If it is not thick enough, burn off some more alcohol. If it is too thick, add a bit of denatured alcohol. Burnt shellac will create an airtight seal, will stick to just about anything, and can be easily removed with alcohol. It also takes a very long time to set (sometimes up to a week).

New brass connectors.

New brass connectors.

The pouch board removed from the upper stack.

The pouch board removed from the upper stack.

The brass connecters are slightly smaller diameter than the lead tubing that was glued into the pouch board, so the holes need to be plugged and re-drilled with the correct size drill bit. To plug the holes, first separate the pouch board from the upper stack by removing all of the screws going through the face of it, then clean any remaining bits of glue or tubing from the holes where the tubing was inserted. Keep track of which screw was where by finger tightening each screw into its correct hole in the upper stack after the board has been removed. Next, cut 88 1-inch-long pieces of wood dowel that will fit snugly into the holes. The proper size for me was 3/16”. Normally when plugging holes, I use plugs that have the grain running horizontally across the plug so that screws wont slice through them. In this case, we are just gluing brass tubes into the holes, so the orientation of the grain doesn't matter, and we can use dowels which have the grain running the length of the dowel. Use any wood glue to glue the dowel pieces into each of the pouch board holes. Push the dowel in about halfway. Once the glue for all of the dowels has set, use a fine toothed saw to cut them flush with the top of the board.

Wood dowels.

Wood dowels.

Dowel glued into the pouch board.

Dowel glued into the pouch board.

Dowel cut off.

Dowel cut off.

Waiting for glue to dry.

Waiting for glue to dry.

Flush cutting the dowels.

Flush cutting the dowels.

Pouch board after plugging holes.

Pouch board after plugging holes.

Use a 5/32” brad point drill bit to drill a hole through the center of each dowel. Drill as vertically as possible. Dump out any wood scraps in the hole, and gently blow each one out with compressed air. Using a small brush, paint a bit of burnt shellac onto the side of a brass connector. Twist the connector while pushing it into the board so that the shellac makes a collar around the connector. Push the connector about halfway into the board. Repeat this with the rest of the holes. At this point you can set this board aside for at least a few days while the shellac hardens.

Plug after drilling and inserting a brass connector.

Plug after drilling and inserting a brass connector.

Applying a drop of burnt shellac to the side of the brass connector.

Applying a drop of burnt shellac to the side of the brass connector.

Spin the connector into the pouch board to create a collar of burnt shellac.

Spin the connector into the pouch board to create a collar of burnt shellac.

Set the board aside for a week to allow the shellac to dry.

Set the board aside for a week to allow the shellac to dry.

When the shellac is hard, re-attach the pouch board to the player action. The next step is to rough cut all of the rubber tubing to go from the tracker bar to the pouch board. Remove the tracker bar from the spoolbox by loosening the four machine screws from either side. The length of tubing can be estimated by holding one end in the approximate location inside the spoolbox and loosely running the other end to the correct brass connector. Be sure to leave some extra slack just in case. Cut the tubing, dip one end in a lubricant, and slide it onto the proper brass nipple on the back of the tracker bar. Make your way through all of the tracker bar nipples, making sure not to loose track of which connector you are measuring to. Cut the four pieces of tubing for the tracking pneumatic as well, following the drawing you made earlier. Attach these to the tracker bar.

Estimating the length of a piece of tubing.

Estimating the length of a piece of tubing.

Lubricating one end of the tubing.

Lubricating one end of the tubing.

Pushing the tubing onto the tracker bar nipple.

Pushing the tubing onto the tracker bar nipple.

Using a razor blade to keep track of which brass connector I am measuring to.

Using a razor blade to keep track of which brass connector I am measuring to.

The tracker bar halfway tubed.

The tracker bar halfway tubed.

Tracker bar fully tubed (except for the two on the left which will lead to the tracking pneumatic).

Tracker bar fully tubed (except for the two on the left which will lead to the tracking pneumatic).

The tracker bar can now be reattached to the spoolbox. You may need to remove the thin panel in the back of the spoolbox to be able to insert the tracker bar from the back. Reinstall the panel after the tracker bar is reattached. Start sliding the free ends of the tubing over the brass connectors. Take your time and make sure that each tube is connected in the correct place. Use a flashlight and look at the back side of the tracker bar to be sure you have the next tube in line. If you have too much slack in a tube, cut it down a bit so that all of the tubes look clean and organized.

Pouch board re-attached.

Pouch board re-attached.

Spoolbox back-board removed for easier installation of tracker bar.

Spoolbox back-board removed for easier installation of tracker bar.

Tracker bar tubing coming out of the back of the spoolbox.

Tracker bar tubing coming out of the back of the spoolbox.

Spoolbox back-board reattached.

Spoolbox back-board reattached.

Attaching the tracker bar tubing to the brass connectors. Make sure the correct tube is being connected.

Attaching the tracker bar tubing to the brass connectors. Make sure the correct tube is being connected.

Keeping the tracker bar tidy after it has been attached to the brass connectors.

Keeping the tracker bar tidy after it has been attached to the brass connectors.

After all of the tubing has been attached to its brass connector, reinstall the player action and give it a test.

Recent Blog Posts


See more of my blog posts here

Hello There! Don't Leave Just Yet!

I provide piano repair information on my blog and through email correspondence free of charge because I like to help people learn about pianos. However, it does take up a significant amount of my time. So, if you are so inclined, you can click the button below to help supply my caffeine habit and show your appreciation for my work. Thank you!

Buy me a matcha latteBuy me a matcha latte

Or Send Bitcoin! bc1q4tz3qzp6a6zeduqema3v6s0vnrhst4zwy4wtp9